Android contacts
<— Return to: https://learn.above.im/s/12aef602-75ec-4367-b619-07ad051e2a6f/doc/contacts-YwlLi3yhL6
—> Next lesson: https://learn.above.im/s/12aef602-75ec-4367-b619-07ad051e2a6f/doc/apple-contacts-4wY0ZMSbZe
The following instructions roughly describe the process to export your contacts on your old Android device - however, depending on the specific device, some details may vary. Still, the process involves the same basic steps.
Regarding using SIM cards to transfer contacts:
It is possible for SIM cards to hold a certain amount of contacts, however this is greatly limited in amount and extense. Still, if you want to just transfer a few phone numbers, and you're planning to bring over your existing SIM card to the Above Phone, you can use this method if your old phone supports saving contacts to SIM cards.
On the Above Phone you can use the import function in the 'Contacts' app once your SIM card has been transferred.
For a more complete migration with more contacts and contact details, you'll want to use .vcf method instead.
Step 1. Export your contacts into a .vcf file
If you have an Android phone, you can export from the Contacts app.
Go to your phones default contacts app
Note: be sure to open the actual Contacts app and not another app that can show your contacts, like the ‘Phone’ app for example. Options to export are usually just found in the Contacts app itself.
Note: this picture is just for reference - your Contacts app will probably have a different icon.Access Export Options:
Look for⋮three dots usually found at the the upper right (or left) corner or find the ⚙️ gear icon or “More” option.Look for ‘Settings’ > Manage contacts > Export options or something along those lines.
examples. left: Google contacts, right: Huawei contacts appGoogle Contacts app
Huawei Contacts app
Note: This can vary depending on your device. On some devices you’d push on ☰ three bars top left towards the upper left, or in the middle left (Samsung),
…or on ⋮ three dots or 4 dots (Huawei) on the upper right.
Select Export - if prompted to select export format: Choose to export to .vcf file if prompted.
ex. Samsung devices - Contacts app > Settings > Manage contacts > Export contactsSamsung Contacts app
Huawei Contacts app
Next, you may be asked to select from your address books, if you have multiple ones - sometimes these are tied to a Gmail account. Take note here to be sure that you're exporting the contacts you'll want to transfer.
Choose Destination:
Pick the destination where you want the .vcf file saved, typically your device’s internal storage or an external storage medium (like a USB thumb drive)Note: If you weren’t asked about the destination, your .vcf file is usually exported to the main internal storage location. (Files > Internal storage), or in your Downloads folder.
ex. Samsung devices - contacts are exported into the 'Internal storage', which can be accessed with 'My Files' or a similar file explorerSave the File:
Tap Save or Export, usually a button at the bottom right. You will see a notification when the export is complete.Locate the file with your Files app:
Usually every Android device has its own native Files app, which allows to explore the device storage and manage all its folders and files. On Samsung devices this app is called My Files
Depending on which device you have, which Contacts app you used, and where you decided to save the file.
The usual places where you would find the exported .vcf file would be in the plain Internal storage (sometimes just called Phone or your device model), or in the Downloads folder.
On this Huawei device, the exported .vcf file can be found in via the Files app inside the Phone section.
It was simply called 00001.vcf
The latest backup file can be recognized by the highest number in the filename, or via the date / time of the file.
Step 2: Transfer .vcf file to Above Phone
Choose a Secure Transfer Method:
Check out our extensive guides to learn about different methods for transferring files to and from the Above Phone right here: File Transfer
For enhanced security, consider using a direct USB connection or an encrypted file-sharing service to transfer the .vcf file to your Above Phone.
Connect both phones via a USB type-C cable, then set your old phone to 'File Transfer' in its USB connection settings. Usually you can swipe down from the top to reveal the notification section, and tap on the USB connection notification that shows after connecting the cable (it usually defaults to 'charging mode')
Options to transfer the file:
USB thumb drive, USB-C cable, LocalSend, Bluetooth, wormhole.app
Step 3: Import Contacts on Above Phone
We also covered this next step in a short video tutorial:
Note: If you want your contacts to be synced, be sure to first set up your synced address book up – in case of the Above Suite, log in to your Above Calendar via DAVx5 and enable CardDAV first, so that you can import your contacts directly to it.
Open the Contacts App on your Above Phone.
Note: be sure to open the actual Contacts app and not the phone app for example. Options to export are usually just found in the Contacts app.
Go to Import Settings:
Tap on the ☰ three bars top left to pull out the sidebar.
Navigate to Settings, then select Import.You may be asked to select from your different address books to import to, if you have multiple ones. Be sure to have the desired address book already available.
Note: if you have multiple address books, be sure to import your contacts to the right one. For example, if you have Above Suit and want your contacts to be synced, be sure to import them in to the ‘Personal Address Book’ with the green DAVx5 logo next to it - be sure to first set up your DAVx5 account.Select the .vcf file:
Browse to the location of the .vcf file now transferred to your Above Phone and select it.Confirm Import:
Follow the on-screen prompts to complete the import process. Your contacts will now be available in the Contacts app on your Above Phone.
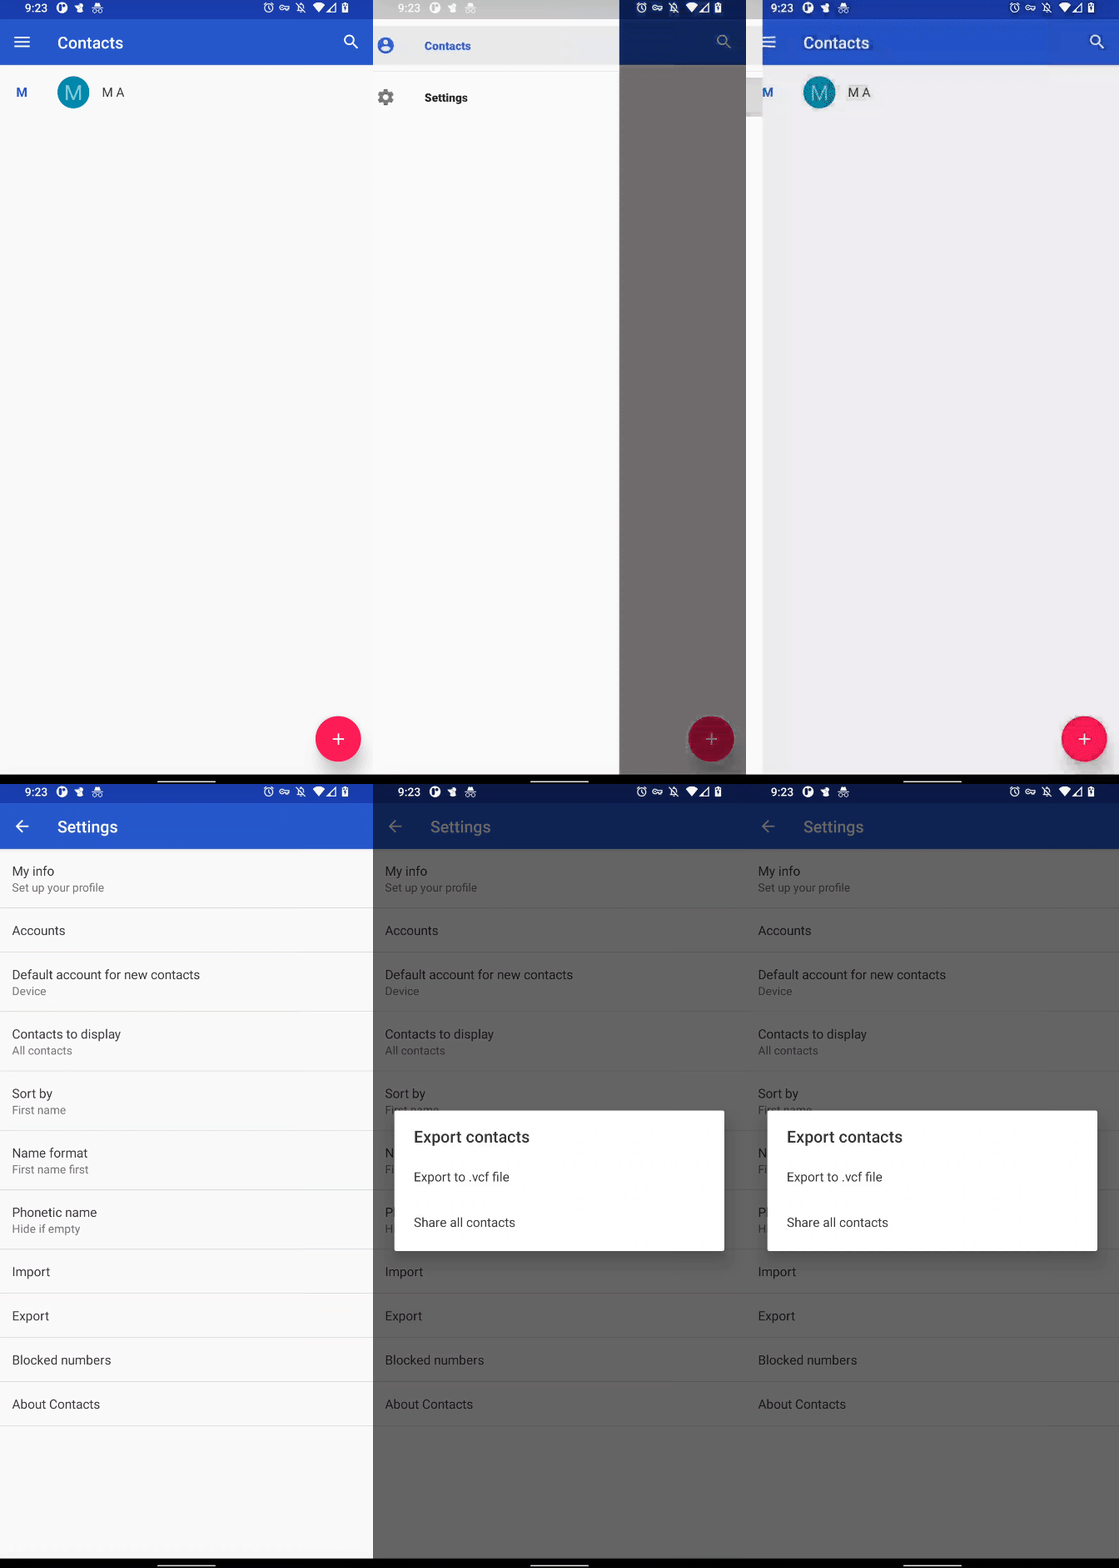
How to export contacts on Above Phone (animation):
Look for three lines towards the left and tap on them to bring out the sidebar.
Tap on Manage Contacts if it shows. Otherwise look for Export
Select Export usually towards the bottom. You may need to specify the location where to save the exported file to.
Select Export to .vcf file if shown.
Get this file to your new phone (ex. via USB transfer, Bluetooth, Email, etc.)
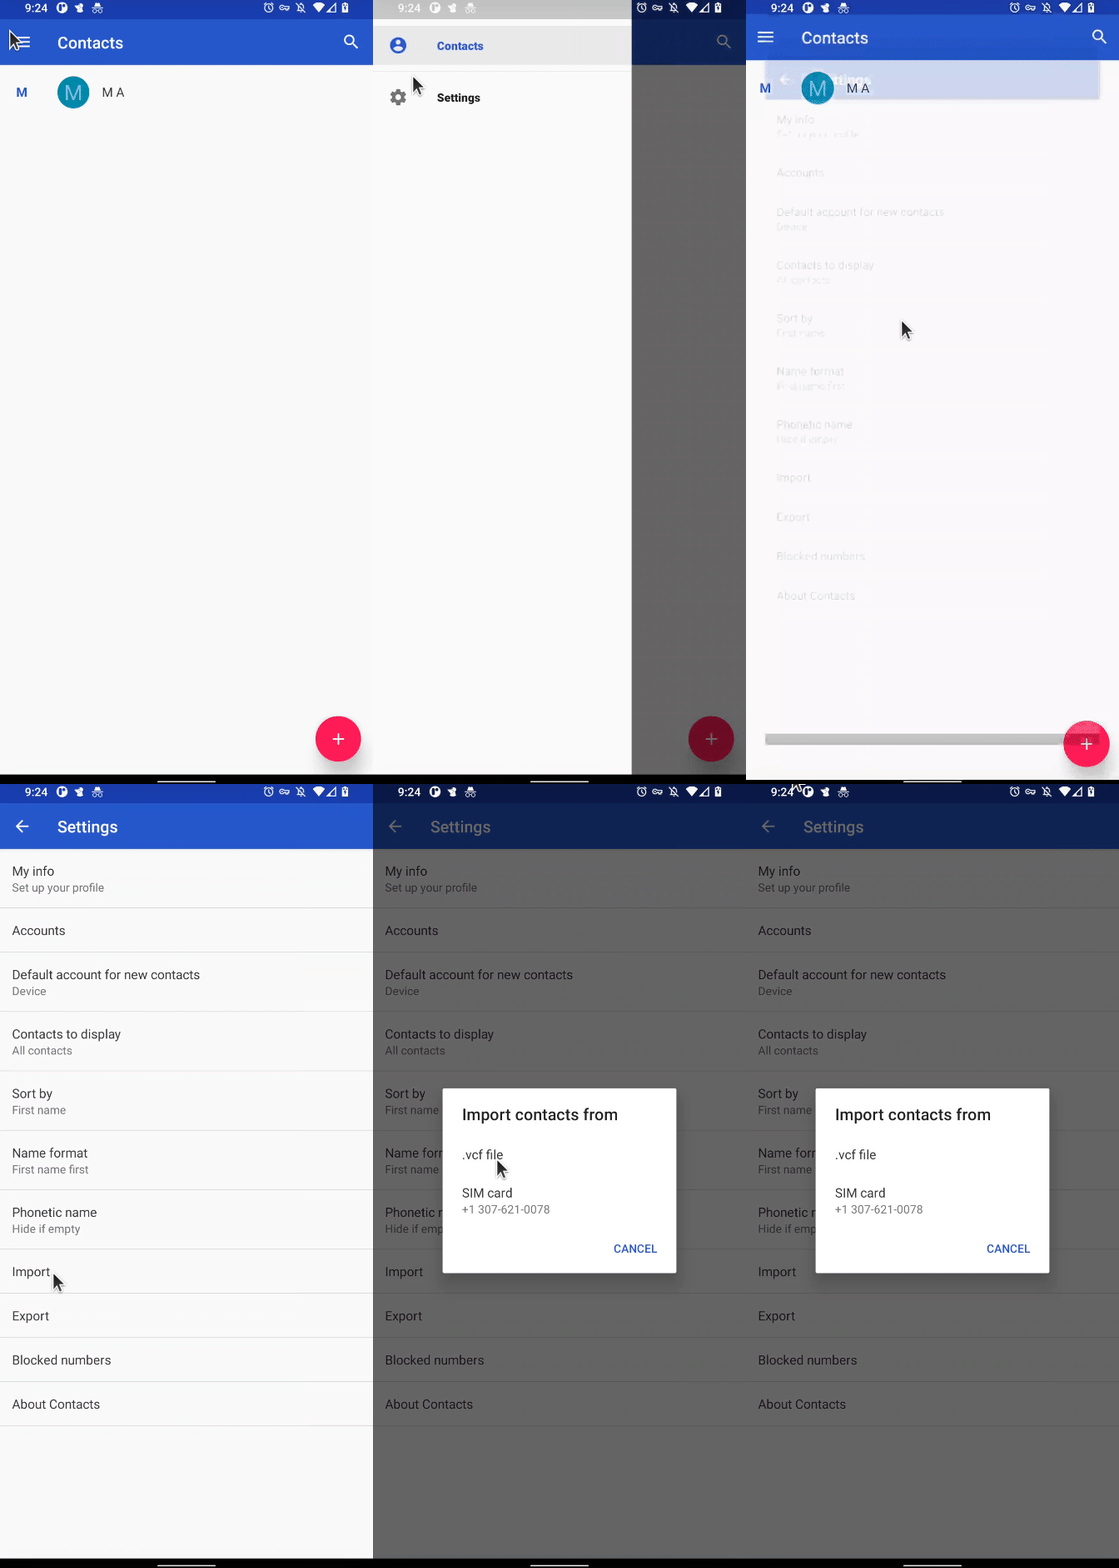
Importing Contacts on the Above Phone (animation)
Once you've gotten your .vcf contact file on your Above Phone - it is easy to import your contacts. Follow these steps.
Launch the default Contacts app
Tap on the top left three lines to bring up the sidebar
Tap on Settings
Select Import towards the bottom
Select .vcf file
(give contacts access to your files if prompted)
Select the file on your drive
(use the three lines top left to navigated to other storage locations if needed)